IDEA
IDEA
 Java
Java
 SpringBoot
 面试题
面试题
 工具
工具
 JDK
JDK
并发(五)之OpenResty:Nginx+lua实现一级缓存

OpenResty
-
什么是OpenResty?
OpenResty?是一个基于 Nginx 与 Lua 的高性能 Web 平台,其内部集成了大量精良的 Lua 库、第三方模块以及大多数的依赖项。用于方便地搭建能够处理超高并发、扩展性极高的动态 Web 应用、Web 服务和动态网关。由国内大神章亦春开发并维护的开源软件;官网::http://openresty.org/cn/ -
安装
官方提供了各种平台下的安装教程:http://openresty.org/cn/installation.html ,可以根据自己的需要安装对应的版本,这里使用的是CentOS的安装sudo yum install -y yum-utils sudo yum-config-manager --add-repo https://openresty.org/package/centos/openresty.repo sudo yum install -y openresty sudo yum install -y openresty-resty sudo yum --disablerepo="*" --enablerepo="openresty" list available // 创建工作目录 mkdir -p /var/openresty // 软件是安装在/usr/local/openresty目录下 cd /usr/local/openresty // nginx的相关的指令还是一样的 // 启动 /usr/local/openresty/nginx/sbin/nginx // 验证配置是否正常 /usr/local/openresty/nginx/sbin/nginx -t // 从起nginx /usr/local/openresty/nginx/sbin/nginx -s reload // 启动之后浏览器访问80端口即可看到相关的页面 如: http://192.168.1.160
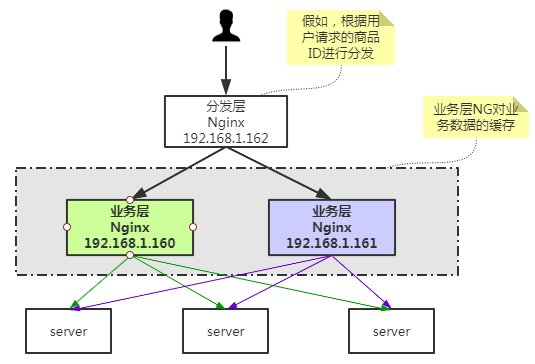
三级缓存实现方案
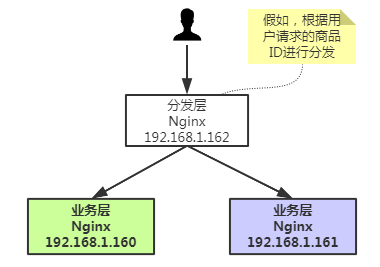
- 分发层
通过Nginx+Lua按业务的特型,将同一类型的请求代理到同一个下游业务Nginx;如根据用户名,将同一个用户的请求代理到同一个业务NG;亦或者是根据商品ID将同一个商品的请求转发到同一个NG;这个得根据具体业务、场景、特性等要素综合分析;目的是为了方便下一级的业务NG能更好的对数据进行一级缓存;如果不这么做,可能会导致缓存命不中的问题;打个比方,当一个叫小明的用户,第一次请求代理到的业务NG1,数据回来NG1并做了本地缓存,结果第二次请求别代理到了NG2,又会走业务系统,这样前一次NG1的缓存压根没起到作用,业务服务响应之后此时NG2也会缓存一份数据,浪费了一份空间。 - 一级缓存
通过Nginx+Lua实现本地缓存。缓存命中,直接就响应客户端,命中失败或者缓存失效,则将请求转发到业务服务,当业务层返回,通过NG+Lua将响应结果缓存在本地; - 二级缓存(如:ehcache)
当一级缓存未命中,请求会走到业务层,此时系统会查找本地堆内存中是否缓存了数据,如果命中,就直接返回; - 三级缓存(redis)
当二级缓存未命中,业务系统会查询Redis,查看Redis中是否缓存数据,如果命中,就直接返回;如果未命中,就会将请求打到数据生产服务,然后通过查找DB将数据捞出来;业务系统收到数据之后,会将数据再次缓存到堆缓存和Redis缓存中并响应客户端中;
准备及整理结构
-
第一步:准备插件
cd /usr/local/openresty/lualib/resty // 建议在https://github.com/ledgetech/lua-resty-http 通过网页下载,实测通过wget下载出现了问题 // 下载之后上传到/usr/local/openresty/lualib/resty // 下载http相关的插件 wget https://github.com/ledgetech/lua-resty-http/blob/master/lib/resty/http.lua wget https://github.com/ledgetech/lua-resty-http/blob/master/lib/resty/http_headers.lua -
配置工作目录
// 整体结构 /var /openresty /project -- 项目名 /lua -- lua脚本 /conf -- nginx的配置 -
创建测试用例hello
// 创建目录 mkdir -p /var/openresty/hello/lua mkdir -p /var/openresty/hello/conf -
配置nginx主nginx.conf注入各个模块的conf配置
vim /usr/local/openresty/nginx/conf/nginx.conf // 在http区域添加以下配置 // 意思是将/var/openresty路径下所有项目中的conf配置全部载入进来 include /var/openresty/*/conf/*.conf; -
创建测试的hello.lua脚本
vim /var/openresty/hello/lua/hello.lua // 添加以下代码 // 向客户端输出1234 ngx.say("1234") -
创建测试的hello.conf
vim /var/openresty/hello/conf/hello.conf // 添加以下配置 server { listen 80; # 配置DNS解析服务器 resolver 223.5.5.5 223.6.6.6 1.2.4.8 114.114.114.114 valid=3600s; location /hello { # 响应的数据类型,文本 default_type text/plain; # 直接返回一个123的文本 #return 200 "123"; # 指向一个lua脚本的路径,请求将由这个lua脚本执行,如果lua无返回,将继续往下执行 content_by_lua_file /var/openresty/hello/lua/hello.lua; } } -
重启服务测试
// 测试配置是否有问题
/usr/local/openresty/nginx/sbin/nginx -t
// 重启
/usr/local/openresty/nginx/sbin/nginx -s reload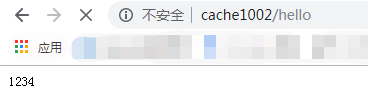
-
其他机器;采用相关的方式将hello的接口配置出来
服务分发
-
转发说明
将cache1002的请求通过userid分发到cache1000和cache1001
-
修改hello.lua
-- 获取所有的请求参数
local uri_args = ngx.req.get_uri_args()
-- 拿到商品ID的字段
local pId = uri_args["productId"]
-- 拿到接口的地址
local uri = ngx.var.uri

-- 可以通过ngx.log打印日志,方便调试
-- ngx.log(ngx.INFO,uri)

-- 业务主机的ip
local host = {"192.168.1.161","192.168.1.160"}
-- 根据商品id计算hash 将请求转发的具体的服务器
local hash = ngx.crc32_long(pId)
-- hash取模得到具体的主机索引 +1是因为Lua的所有是从1开始的 #host计算主机的个数
hash = (hash % #host) + 1

-- 组装后端请求的地址
local backend_url = "http://"..host[hash]

-- 获取当前请求的请求方式
local method = uri_args["method"]

-- 引入http的工具
local http = require("resty.http")
-- 创建一个客户端的连接对象
local httpc = http.new()

-- 发起客户端请求
local resp, err = httpc:request_uri(
    backend_url,   -- 请求地址
    {
      method = method,  -- 请求方式
      path = uri,      -- 接口地址
      query=uri_args    -- 请求参数
    }
)

-- 判断是否有响应结果
if not resp then
    -- 没有的话 说明异常了,把异常信息返回给客户端
    ngx.say("error:", err)
    -- 终止后续流程,如果不return将会继续往后执行
    return
end

-- 响应请求结果
ngx.say(resp.body)

-- 关闭连接
httpc:close()
重启nginx
-
160和161的配置
// 修改hello.lua脚本为一下内容,注意,为了方便测试查看 cache1000表示当前的主机名
// 输出格式为主机名加上各个参数的输出

local uri_args = ngx.req.get_uri_args()

ngx.say("cache1000")
for k,v in pairs(uri_args) do
  ngx.say(k..":"..v)
end
// 重启服务
-
测试
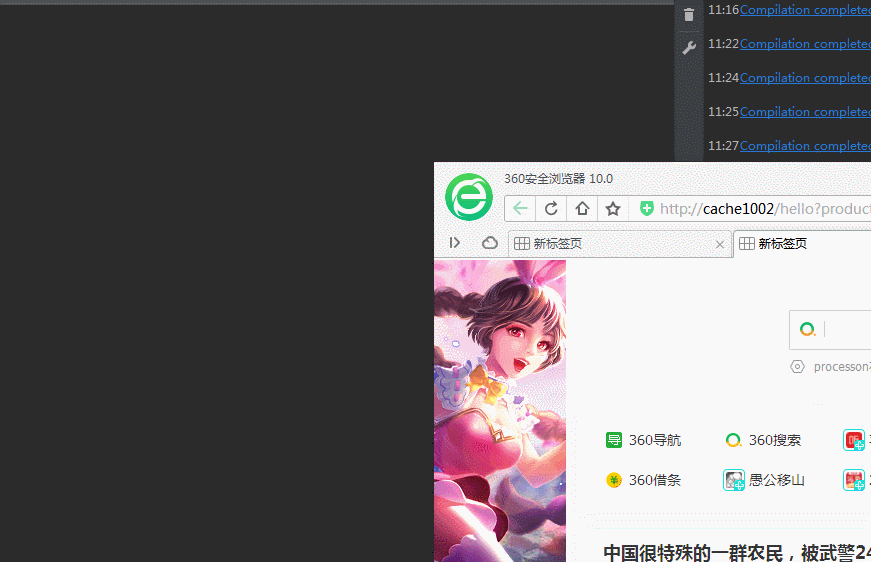
http://cache1002/hello?productId=1&a=2&b=123
http://cache1002/hello?productId=5&a=2&b=234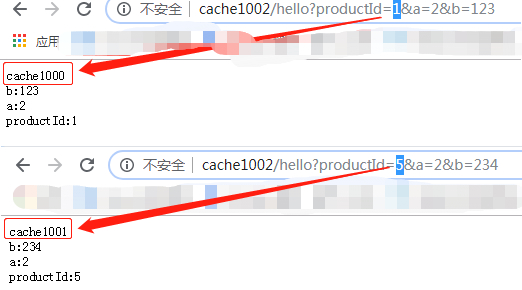
基于Lua的Nginx缓存
因为缓存属于业务模块,因此需要在cache1000和cache1001两台机器上配置Nginx的缓存,如下图:
准备工作
-
资源下载
https://github.com/bungle/lua-resty-template // 下载并解压 cd lua-resty-template-master/lib/resty cp template.lua /usr/local/openresty/lualib/resty/ mkdir -p /usr/local/openresty/lualib/resty/html cp ./template/html.lua /usr/local/openresty/lualib/resty/html/ // 创建测试模版的路径 mkdir -p /var/openresty/hello/templates -
修改hello.conf
vim /var/openresty/hello/conf/hello.conf // 添加以下配置 /var/openresty/hello/templates 表示模版存放的路径 set $template_location "/templates"; set $template_root "/var/openresty/hello/templates"; -
配置缓存
vim /usr/local/openresty/nginx/conf/nginx.conf // 添加以下配置 lua_shared_dict lupf_cache 128m; -
测试接口
// 以下是本地开发的一个用于测试使用的接口,会根据ID模拟返回一个商品信息
// 此接口很随意,本文关注的是ng的缓存,所以这里随意给个接口即可
http://192.168.1.82:19002/product/getbyid?productId=1

// 响应数据
{
    "id": 1,
    "title": "xxx手机",
    "desc": "重构一切",
    "price": 4999,
    "icons": "a.png;b.png"
}
模版创建
-
模版标签语法说明
{* expression *}:表达式(变量)转义输出,类似于Spring MVC中输出ModelAndView中的变量; {( template )}:所包含的模板文件,类似于JSP中的include标签,一般我们可以将网页通用的head和footer包含进来; {{ expression }}:表达式(变量)做HTML转义输出;; {% lua code %}:Lua代码执行块; {[ expression ]}:包含表达式文件 (表达式结果),可以这样使用:{["file.html", { message = "Hello, World" } ]},上面是官方文档给的注释,个人觉得和{(template)}没啥区别,直接在上面写表达式会报错; {# comment #}:代码注释(不输出、不执行); {-block-}...{-block-}:该标签对的内容会被识别为一个Lua代码块,(请注意block不要用成verbatim或raw了,否则会被识别为纯文本输出); {-verbatim-}...{-verbatim-} 或者 {-raw-}...{-raw-}:两类标签的内容不会被lua-resty-template解析,并作为纯文本输出; -
创建模版
cd /var/openresty/hello/templates
vim product.html

// 添加以下测试的html模版
<html>
  <head>
    <meta http-equiv="Content-Type" content="text/html; charset=UTF-8">
    <title>商品详情页</title>
  </head>
  <body>
    商品id: {* productId *}<br/>
    商品标题: {* productTitle *}<br/>
    商品描述: {* productDesc *}<br/>
    商品价格: {* productPrice *}元<br/>
  </body>
</html>
Lua脚本编写
-
修改cache1000和cache1001上的hello.lua
-- 拿到所有的请求参数 local uri_args = ngx.req.get_uri_args() local pId = uri_args["productId"] -- lupf_cache为conf中配置 local cache_ngx = ngx.shared.lupf_cache -- 组装缓存的key local productCacheKey = "product_info_"..pId -- 获取缓存 local productCache = cache_ngx:get(productCacheKey) -- 删除缓存 测试使用 -- cache_ngx:delete(productCacheKey) -- 判断是否获取到了缓存 if productCache=="" or productCache == nil then -- 引入http模块 local http = require("resty.http") -- 创建一个http的连接 local httpc= http.new() -- 获取数据的路径 local url = "http://192.168.1.82:19002" -- 接口地址 local path = "/product/getbyid" -- 请求接口 local resp,err=httpc:request_uri( url, { method="GET", -- 接口的请求方式 path = path, -- 接口的地址 query = {productId=pId} -- 接口参数 } ) -- 判断是否有响应结果 if not resp then -- 没有的话 说明异常了,把异常信息返回给客户端 ngx.say("error:", err) -- 终止后续流程,如果不return将会继续往后执行 return end -- 获取响应的数据 productCache = resp.body -- 将数据设置到缓存 cache_ngx:set(productCacheKey,productCache,10*60) end -- 输出,调试所用 -- ngx.log(ngx.INFO,"productCache:"..productCache) -- 引入json模块 local cjson = require("cjson") -- 将本地的缓存转换为json对象 local productCacheJSON = cjson.decode(productCache) -- 设置数据与模版匹配关系的上下文 local context = { productId = productCacheJSON.id, productTitle = productCacheJSON.title, productDesc = productCacheJSON.desc, productPrice = productCacheJSON.price } -- 引入模版模块 local template = require("resty.template") -- 载入模版 template.render("product.html", context) -
测试
//目前的缓存策略
1、nginx缓存数据30s
2、本地对缓存数据2条
3、redis缓存数据60s
第一次加载数据
30s nginx过期,60s redis过期等测试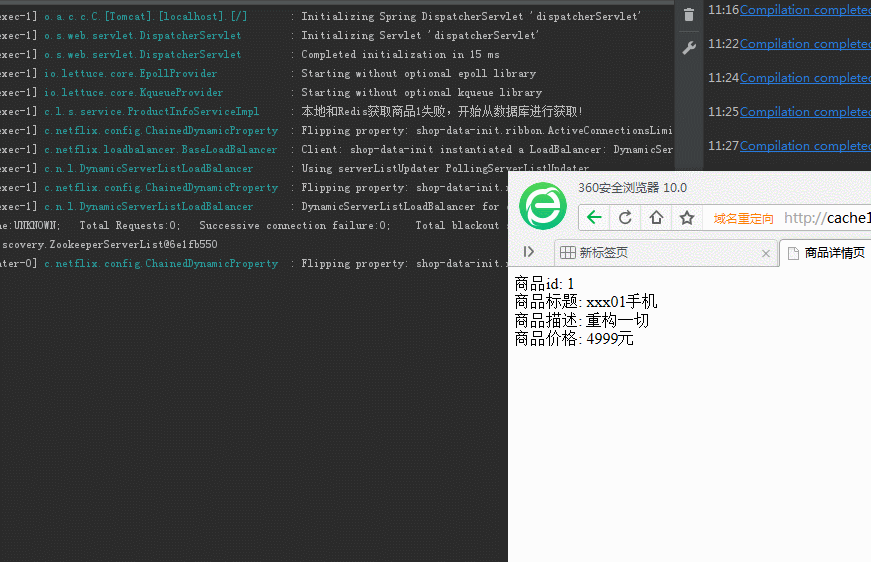
到此,基于NG的缓存已经可以实现,但是,这个中间还存在了一些问题,比如服务发现问题,新加的服务无法自动加入服务,挂了的服务无法踢出;热点数据的问题!这些其实也有方案可以去解决,但是这里主要讲的是缓存方案;后续整理之后再继续完善这部分功能。