 IDEA
IDEA
 Java
Java
 SpringBoot
 面试题
面试题
 工具
工具
 JDK
JDK
SpringBoot整合sharding-jdbc:简单的水平分表

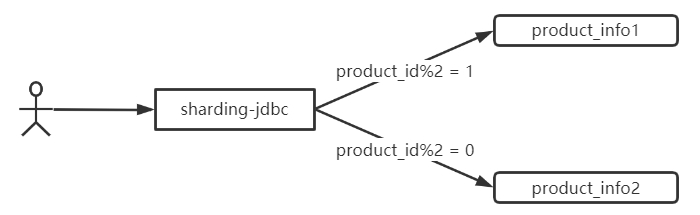
为了能更加直观的感受到sharding-jdbc的功能,亲自写代码验证是最有效的方案,下面就通过sharding-jdbc来实现一个最常用到的分库方案----水平分表;将数据以特定的键分摊到不同的表中,降低单表的数据量,提升操作效率
需求
将商品表数据以商品ID水平分摊到两张不同的表,偶数id放1表,基数id放2表
-
数据库表创建
DROP TABLE IF EXISTS `product_info1`;
CREATE TABLE `product_info1`  (
  `product_id` bigint(20) NOT NULL COMMENT '商品ID',
  `product_title` varchar(255) CHARACTER SET utf8 COLLATE utf8_general_ci NULL DEFAULT NULL COMMENT '商品标题',
  `product_desc` varchar(255) CHARACTER SET utf8 COLLATE utf8_general_ci NULL DEFAULT NULL COMMENT '商品描述',
  `product_price` decimal(10, 2) NULL DEFAULT NULL COMMENT '商品价格',
  `shop_id` bigint(20) NULL DEFAULT NULL COMMENT '店铺id',
  PRIMARY KEY (`product_id`) USING BTREE
) ENGINE = InnoDB CHARACTER SET = utf8 COLLATE = utf8_general_ci ROW_FORMAT = Dynamic;

DROP TABLE IF EXISTS `product_info2`;
CREATE TABLE `product_info2`  (
  `product_id` bigint(20) NOT NULL COMMENT '商品ID',
  `product_title` varchar(255) CHARACTER SET utf8 COLLATE utf8_general_ci NULL DEFAULT NULL COMMENT '商品标题',
  `product_desc` varchar(255) CHARACTER SET utf8 COLLATE utf8_general_ci NULL DEFAULT NULL COMMENT '商品描述',
  `product_price` decimal(10, 2) NULL DEFAULT NULL COMMENT '商品价格',
  `shop_id` bigint(20) NULL DEFAULT NULL COMMENT '店铺id',
  PRIMARY KEY (`product_id`) USING BTREE
) ENGINE = InnoDB CHARACTER SET = utf8 COLLATE = utf8_general_ci ROW_FORMAT = Dynamic;


# 以下是测试多表操作时的测试表 可以忽略
#CREATE TABLE `db0`.`user_info`  (
#  `user_id` bigint(20) NOT NULL COMMENT '用户唯一ID',
#  `user_name` varchar(255) CHARACTER SET utf8 COLLATE utf8_general_ci NULL DEFAULT NULL COMMENT '姓名',
#  `user_age` int(255) NULL DEFAULT NULL COMMENT '年龄',
#  `from_id` int(11) NULL DEFAULT NULL COMMENT '归属地',
#  PRIMARY KEY (`user_id`) USING BTREE
#) ENGINE = InnoDB CHARACTER SET = utf8 COLLATE = utf8_general_ci ROW_FORMAT = Dynamic;
SpringBoot整合sharding-jdbc
依赖引入
<!-- sharding-jdbc整合spring的依赖 -->
<dependency>
    <groupId>org.apache.shardingsphere</groupId>
    <artifactId>sharding-jdbc-spring-boot-starter</artifactId>
    <version>4.0.0-RC1</version>
</dependency>
<!-- mybatis -->
<dependency>
    <groupId>org.mybatis.spring.boot</groupId>
    <artifactId>mybatis-spring-boot-starter</artifactId>
    <version>2.0.0</version>
</dependency>
<!-- mysql 数据库连接 -->
<dependency>
    <groupId>mysql</groupId>
    <artifactId>mysql-connector-java</artifactId>
    <version>5.1.47</version>
</dependency>
<dependency>
    <groupId>com.alibaba</groupId>
    <artifactId>druid</artifactId>
    <version>1.1.16</version>
</dependency>
通过mybatis-generator自动生成PO、Mapper、mapping
之前的文章: https://blog.csdn.net/lupengfei1009/article/details/87986987 有详细的介绍如何使用mybatis-generator,这里就不做赘述,生成之后,将得到如下如的结构

启动类添加mybaitis的扫描
记得根据你实际的地址填写
@MapperScan("com.lupf")
配置sharding-jdbc
sharding-jdbc有多种配置方式,支持properties、yml、或者直接通过代码去配置,可以根据个人的习惯去采用
推荐一个在线yaml、properties互相转换的工具:https://www.toyaml.com/index.html
-
yml
mybatis: mapper-locations: classpath:mapping/*.xml server: port: 8888 spring: shardingsphere: datasource: db0: driver-class-name: com.mysql.jdbc.Driver password: 123456 type: com.alibaba.druid.pool.DruidDataSource url: jdbc:mysql://192.168.1.220:3306/db0?useUnicode=true&characterEncoding=UTF-8&autoReconnect=true&failOverReadOnly=false&maxReconnects=15000&allowMultiQueries=true&useSSL=false username: root names: db0 props: sql: show: true sharding: tables: product_info: actual-data-nodes: db0.product_info$->{1..2} key-generator: column: product_id type: SNOWFLAKE table-strategy: inline: algorithm-expression: product_info$->{product_id % 2 +1} sharding-column: product_id -
properties
mybatis.mapper-locations=classpath:mapping/*.xml
server.port=8888

# 配置数据源 有几个就配置几个
spring.shardingsphere.datasource.names=db0

# 数据源的基本信息 包含地址等,关于多个数据源的,后面也会介绍到
# 这特别需要注意的就是路径里面的db0,需要和上面配置的数据源的名称一致
spring.shardingsphere.datasource.db0.url=jdbc:mysql://192.168.1.220:3306/db0?useUnicode=true&characterEncoding=UTF-8&autoReconnect=true&failOverReadOnly=false&maxReconnects=15000&allowMultiQueries=true&useSSL=false
spring.shardingsphere.datasource.db0.username=root
spring.shardingsphere.datasource.db0.password=123456
spring.shardingsphere.datasource.db0.driver-class-name=com.mysql.jdbc.Driver
spring.shardingsphere.datasource.db0.type=com.alibaba.druid.pool.DruidDataSource

# 配置水平分表的策略
# $->{1..2}表达式表示了两种结果 db0.product_info1和db0.product_info2
spring.shardingsphere.sharding.tables.product_info.actual-data-nodes=db0.product_info$->{1..2}
# 指定某个列的生成规则 这里的product_id列采用雪花片算法
spring.shardingsphere.sharding.tables.product_info.key-generator.column=product_id
# 配置雪花片算法
spring.shardingsphere.sharding.tables.product_info.key-generator.type=SNOWFLAKE
# 设置分表的计算规则 {product_id % 2 +1} 表示将product_id取模后+1 就可以满足需求中说的偶数1表 基数2表
spring.shardingsphere.sharding.tables.product_info.table-strategy.inline.algorithm-expression=product_info$->{product_id % 2 +1}
# 基于那个列的数据进行分表
spring.shardingsphere.sharding.tables.product_info.table-strategy.inline.sharding-column=product_id

# 以下是配置另外的表的测试
#spring.shardingsphere.sharding.tables.user_info.actual-data-nodes=db0.product_info$->{1..2}
#spring.shardingsphere.sharding.tables.user_info.key-generator.column=user_info
#spring.shardingsphere.sharding.tables.user_info.key-generator.type=SNOWFLAKE
#spring.shardingsphere.sharding.tables.user_info.table-strategy.inline.algorithm-expression=user_info$->{user_info % 2 +1}
#spring.shardingsphere.sharding.tables.user_info.table-strategy.inline.sharding-column=user_info

# 打印日志
spring.shardingsphere.props.sql.show=true
测试操作
添加
使用generator生成的insert方法会将product_id主键的字段也带进去;这里我们测试的时候,是让sharding-jdbc去自动帮我们按雪花片算法生成id;因此需要将自动生成的xml中,将insert里面关于product_id给去掉
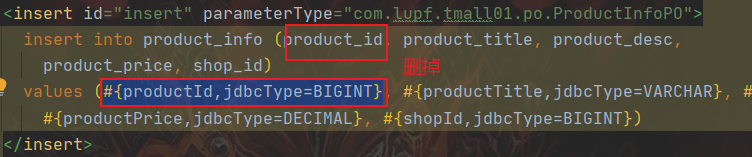
<insert id="insert" parameterType="com.lupf.tmall01.po.ProductInfoPO">
  insert into product_info ( product_title, product_desc,  product_price, shop_id) values (#{productTitle,jdbcType=VARCHAR}, #{productDesc,jdbcType=VARCHAR},#{productPrice,jdbcType=DECIMAL}, #{shopId,jdbcType=BIGINT})
</insert>
mapper对应的方法
int insert(ProductInfoPO record);
测试用例
@Test
public void insert() {
    Random random = new Random();
    for (int i = 0; i < 10; i++) {
        ProductInfoPO productInfoPO = new ProductInfoPO();
        // sharding-jdbc帮我们生成
        // productInfoDao.setProductId(1l);
        productInfoPO.setProductTitle("标题");
        productInfoPO.setProductDesc("商品描述述述述述述述述述述述述述述述述。。。。");
        productInfoPO.setProductPrice(new BigDecimal(random.nextInt(1000)));
        productInfoPO.setShopId(0L);
        productInfoPOMapper.insert(productInfoPO);
    }
}
日志输出
: Logic SQL: insert into product_info ( product_title, product_desc, product_price, shop_id) values (?, ?, ?, ?)
: Actual SQL: db0 ::: insert into product_info2  (product_title, product_desc, product_price, shop_id, product_id) VALUES (?, ?, ?, ?, ?) ::: [标题, 商品描述述述述述述述述述述述述述述述述。。。。, 791, 0, 511927267379642369]
: Rule Type: sharding
: Logic SQL: insert into product_info ( product_title, product_desc, product_price, shop_id) values (?, ?, ?, ?)
: Actual SQL: db0 ::: insert into product_info1  (product_title, product_desc, product_price, shop_id, product_id) VALUES (?, ?, ?, ?, ?) ::: [标题, 商品描述述述述述述述述述述述述述述述述。。。。, 145, 0, 511927267392225280]
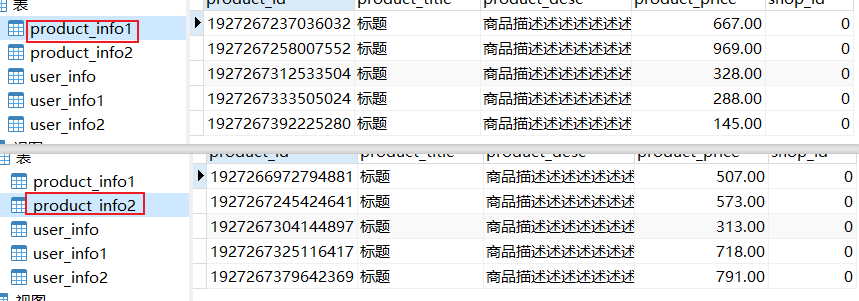
如日志所示,逻辑sql是往product_info插入数据,sharding-jdbc根据雪花片算法生成的id,计算出不同的真实表,然后调整sql往对应的真实表中插入数据;如上:511927267379642369%2+1=2 就往product_info2表中插入了数据,511927267392225280%2+1=1就往product_info1表中插入了数据。
查询
-
根据分片ID查
当根据id查询的时候,由于商品表就是根据id进行分片的,所以能够明确的知道对应id的数据是保存在那个表的,就会直接到对应的真实表进行查询
@Test
public void findById(){
    productInfoPOMapper.selectByPrimaryKey(511927267392225280l);
}
日志输出
: Logic SQL: select product_id, product_title, product_desc, product_price, shop_id from product_info where product_id = ?
: Actual SQL: db0 ::: select  product_id, product_title, product_desc, product_price, shop_id from product_info1 where product_id = ? ::: [511927267392225280]
因为通过511927267392225280可以明确知道数据保存在那个真实表,所以就直接去查询了
-
根据非分片ID查询
由于没有id,所以sharding-jdbc不知道数据保存在什么地方,因此会到每个分片表都去查询一遍,然后将结果合并之后返回客户端;如查询商品价格等于288的商品
<select id="selectByPrice" parameterType="java.math.BigDecimal" resultMap="BaseResultMap">
  select <include refid="Base_Column_List" /> from product_info where product_price = #{price}
</select>

List<ProductInfoPO> selectByPrice(BigDecimal price);

    @Test
    public void findByPrice(){
        productInfoPOMapper.selectByPrice(new BigDecimal(288));
    }
日志输出
: Logic SQL: select product_id, product_title, product_desc, product_price, shop_id from product_info where product_price = ?
: Actual SQL: db0 ::: select product_id, product_title, product_desc, product_price, shop_id from product_info1 where product_price = ? ::: [288]
: Actual SQL: db0 ::: select product_id, product_title, product_desc, product_price, shop_id from product_info2 where product_price = ? ::: [288]
由于无法分辨出数据存在哪里,因此就到product_info1和product_info2中分别查询了一次,然后进行了结果的合并。
总结
当使用sharding-jdbc的时候,对程序员来说,完全是透明的,跟操作单库是没有任何区别的,如何分库,如何分表,你只要将规则制定好之后,剩下的全部都交由sharding-jdbc去管理了;

标题:SpringBoot整合sharding-jdbc:简单的水平分表
作者:码霸霸
地址:https://lupf.cn/articles/2020/09/14/1600067543196.html